Last updated on March 24th, 2022
Outdoor lighting plays a significant role in enhancing the security and safety of your home and highlighting its beauty at night. Your kids will not easily stumble on an object on the driveway when the light is on. Burglars will also think twice before approaching your home. These intruders tend to avoid a home that looks occupied. However, sometimes this good light just won’t come on. Finding the solution to this problem starts with a simple question, “why is my outside light not working?” Or, “how to fix my Christmas light not working, especially”.
Outdoor lights will not work when the light bulb is burnt out, or the light fixture is damaged. The other culprits include a tripped circuit breaker in your electrical panel and a failed power source due to tripped GFCI (Ground Fault Circuit Interrupter). If you live in places that experience severe storms, then a power outage could also be a reason why your outside light fails to work.
Table of Contents
Reasons why the outside light might not be working
There are multiple reasons why the outside lights may go out without warning. The reasons range from simple and easy-to-fix problems to more complex issues that require the help of a professional electrician. Before you go ahead and summon a professional, consider these possibilities:
The bulb is burnt out
Burnt-out bulbs are a common culprit where the outdoor light is not working. Most of the time, you’ll just need to replace the light bulb to get the problem fixed. You may need a ladder to climb, depending on where the bulb is located, or if the outdoor floodlight doesn’t work.
The bulb may also be improperly set into its socket, causing the electrical current to break. Check to see if this is the issue before you buy another bulb for replacement.
In any case, you won’t need to hire a professional for this task. Changing the bulb or setting one properly into the socket is easy. You can do it by yourself and save the money that you could have otherwise paid a professional.
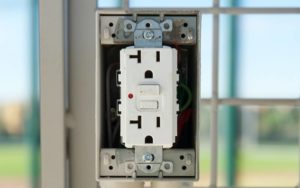
2. The GFCI is tripped
GFCI is the acronym for Ground Fault Circuit Interrupter. It is a fast-acting circuit breaker that shuts off electric power in the event of a ground fault. The ground-fault circuit interrupter acts within as little as 1/40 of a second.
Electrical cables for outdoor lighting are typically run underground. Water can usually work its way into electrical outlets when there is a heavy downpour or storm.
 Electricity and water do not play well together, so the GFCI plug is designed to cut off electrical current as soon as water enters it. This fail-safe is built into the GFCI to prevent more perilous events from happening.
While the fail-safe in your GFCI is intended to keep your home safe, it prevents electrical energy from reaching your outdoor lighting system – keeping the lights off.
Locate your GFCI outlet and reset it to fix this issue. To reset the ground fault circuit interrupter, press and hold the RESET button until it bolts. If the GFCI does not reset using this procedure, the chances are that the wiring in the circuit or the outlet itself has a problem – it’s probably the right time to call an electrician.
You may want to consider buying a bubble cover if you experience this problem frequently. The cover will shield your outlet from water and keep the GFCI from tripping.
3. The circuit breaker in your electrical panel is tripped
If the outdoor light is still not coming on after resetting the GFCI ground fault circuit outlet, the next place to look is the circuit breaker in your electrical panel.
The circuit breaker will trip if there is a bad connection. Bad connections can result from any number of issues, including rodent damage, moisture, dry rot, worn-out fixtures, or exceedingly rigorous landscape lighting transformer maintenance.
Any of these conditions can cause a short somewhere in the connection system. If wires are touching, the circuit breaker will trip as a built-in safety measure.
Identify the line where the light is not working and check its corresponding circuit breaker in the electrical panel. The first thing to do here is to locate the panel. Often, you’ll find them in your garage, utility room, or basement.
Open the utility closet and check to see if there is any breaker not set to the ON position. All you have to do is flip it right back on.
4. Power Outage
If you live in a place where severe storms are common, you will likely experience power outages. These can affect your outdoor lighting directly and indirectly, and realize that your outside light not working after rain.
The outdoor lights will inevitably go off when there is a power outage. If this lasts for several hours, it will affect your astronomical timer too. The timer switches over to battery mode to keep performing its role.
The batteries on your astronomical timer eventually run out, and the timer can no longer keep the outside lights going on and off at the right time. This situation can mean that your porch lights remain off even when there is electricity.
How do you fix an outside light?
How to fix an outside light will depend on the cause of the outage. Since you will have to diagnose the cause of the power outage first before you can fix it, here is a simplified step-by-step procedure to follow.
Step 1: Check the lighting fixture for apparent signs of physical damage. The appliance could be broken or knocked over, especially for lights on the ground. Either issue will likely cause the inner workings of the LED to become defective, therefore, no longer allowing the fixture to operate correctly.
For a wholly damaged fixture, the solution would be to buy a new one and replace the damaged one. A fixture that has sustained only partial damage can be repaired and restored to its proper working condition.
Step 2. Try a new bulb. More than likely, you will find that your light is not working due to a burnt-out bulb. You will be able to find this out by trying out a new bulb in its place. If the new bulb lights up, then the problem would be the damaged bulb and not the whole fixture.
Step 3. Examine the light fixture. Start by turning off the electrical power and confirming that no electrical current is running through the fixture before disassembling it.
You can use a neon tester lamp to determine if there is electrical power. To use the tester, connect the red test lead to the hot side of the outlet and the black test lead to the neutral side. The neon lamp will glow if an electrical current flows through the exposed wires or test terminals.
Once you have tested and confirmed that the power is off, disassemble the light fixture by removing the attaching screws.
Examine the base for any burns where the bulb goes in. Check the wiring for loose nuts and tighten them. The appearance of burns would indicate a loose connection or loose screws causing an unsteady electrical current flow. It helps to replace the burnt lines with new ones before tightening them.
If you notice burns at the base of the porcelain screw socket, you’ll want to replace the screw socket before reassembling the unit.
While examining the unit, ensure you replace any loose nuts. Such nuts may allow exposed wires to make contact cause a short. Replacing them is a sure way to keep the socket from experiencing short circuits.
Step 4: Check both the easy-lock and mini-connector. These are what connect the individual outdoor light to the entire lighting system.
Your light will not work if one or both of these connectors are not properly connected. Disconnect both the easy-lock and mini-connector and examine them for any defects before you reattach them. Once done, turn the power back on and see if that fixes the lighting problem.
Here is what to look for while examining the connectors:
- The easy-lock – ensure that the 14/2 or 12/2 gauge cable is lined straight and the wire guide is placed with the right side facing up. Also, do not cross thread it when twisting the cap down.
- The mini-connector – ensure that the mini-connector is firmly tightened when attaching it.
Step 5: Follow the mainline cable from the non-working fixture backward for any damage. Both human activity and rodents can damage the cord and interfere with the power flow.
Check general areas around the fixtures that have had recent landscape maintenance work done. Rigorous landscape work may inadvertently cause damage to lighting cables running underground.
Look for any physical damage to the cable. If you find one, cut the flanks of the damaged area and use a CC-2 connector to rejoin those two ends.
Alternatively, you may want to examine the junction points if you already have CC-2 connectors in your project. These connectors can sometimes become loosened or dislodged, breaking the electrical current to any fixtures beyond that point.
How do you test an outdoor light fixture after repair?
We have pretty much covered this in the previous section. However, the importance of turning off the electrical power before touching your fixture couldn’t be overemphasized. As already mentioned, ensure you use a simple tool such as a neon tester lamp to confirm no electrical current in the wires you are working on.
Once everything is back in its place, replace the bulb with the one you know is working, then switch the power back. This is an easy way to test if the problem is sorted out and the light is working. In case you do not have a working bulb with you, consider using a light socket tester or multimeter to test the fixture.
Can you put a plug on an outside light?
There are two different wiring options available for outdoor lights:
- Hardwiring the outdoor lights to the switch itself.
- Wiring the outdoor lights to an exterior outlet with a transformer. Once you flick the switch on, it turns the outlet on, which activates the transformer.
In either case, you can use an RCD (residual current device) and plug it into the socket for outside lighting.
An RCD is a life-saving device designed to prevent fatal electric shock if one touches something with an electrical current, such as a bare electrical wire. With outside lights, it is highly recommended to ask a professional one major question; “are outdoor lights safe in the rain.”
What cable do I need for outside lights?
The right cable for supplying power to your outdoor system is a 1.5mm² three-core steel-wire-armoured cable (SWA). If your landscape lighting is covering a large area, a 12-gauge or 10-gauge wire is recommended. Standard wires for landscape lighting are 16-, 14-, 12-, and 10-gauge wires. The 10- or 12-gauge options are recommended to prevent voltage drop. The further you get from the power supply and transformer, the more resistance occurs in the circuit, which causes a decrease in voltage.
Precautions when fixing outdoor lights
While fixing outdoor lighting installation is generally uncomplicated, you should always take some precautions whenever you are handling electricity.
- Your safety first: always wear protective gloves and glasses when installing your outdoor lights.
- For overhead porch lights, check your ladder to ensure it is securely mounted before climbing it.
- Ensure you connect each wire to its rightful place – black or red is hot, white or gray represents neutral, and green or bare copper is the ground wire. Each of these should go into its respective places with coordinating colours.
- Last and most importantly, always remember to turn off the power from the main circuit breaker before you start messing around with electrical wires. Touching live electric cables can lead to electric shock, which might be fatal for projects involving high voltages.
Care and Maintenance tips for outdoor lights
Like any appliance at home, following a proper care routine for your outdoor lights can prevent frequent breakdowns and help you avoid costly repairs.
- Clean the lights to make them remain bright and extend their life
- Check the bulbs frequently. Your remaining bulbs are likely to burn out quickly if one or two of them burns out and stay without replacement.
- Adjust the timers on your outdoor lights to avoid wasting electricity and burning out the bulbs unnecessarily.
- Check for exposed cables that could be prone to damage.
Conclusion
We hope that one of the guidelines we have provided in this write-up helps answer these questions ‘why is my outside light not working, or outside lights not working but has power, so you can identify and fix the issue with your lighting fixture.
If not, then it may be time to get the pros to sort out the issue for you.
DIY, or doing it yourself, is acceptable. It could help you save a ton of cash. But you should know when it is time to call in the pros – like when you are unable to understand the problem entirely such as outside light not working after rain. Nonetheless, ensure you follow these guidelines carefully before you decide to seek a professional electrician.
Frequently asked questions.
Why my outdoor lights not working after rain?
There are three common problems that can lead to outdoor light malfunction after rains. They include power blackouts, tripped circuit breakers and GFCI.
Can you protect outdoor lights from rain?
Yes, it is possible to protect outdoor lights from rain. Though there are several ways you can achieve this, the best way is to use solar lights. These types of lights do not require wiring hence there is no danger of short-circuiting leading to fire outbreaks.
Why are my low-voltage lights not working?
The low-voltage lights may not work due to various reasons such as tripped circuit breakers, bad connections, cut lines during planting or pruning, bad lamps, or lightning.
Why landscape lights won’t turn off
A common cause of this problem can be linked to cadmium-sulphide photocells in most of these lights that can start to change in value with time and becomes faulty. The only solution to this issue is to replace the photocell unless you understand electronics and soldering.
Why outdoor light not working after changing bulb?
If you have confirmed there is nothing wrong with your connections but the lights are not working after changing bulbs, it is likely that the sensors on the outside light have gone bad. You can consider checking the sensors if you are familiar with electronics, or get a new fixture and a different bulb brand with working sensors.
