Last updated on July 25th, 2022
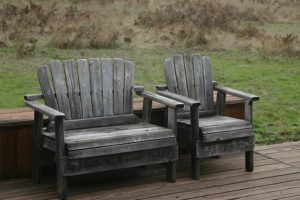
Outdoor wood furniture are often exposed to the elements, so it’s not uncommon for them to show signs of rot or weathering. If you have a set that looks drab out in the yard, then it’s probably time to make a change. But before you rush out to splash the cash on a new piece, this guide will show you how to restore weathered outdoor wood furniture.
The best way to restore outdoor wood furniture is to repair the surface and add new coating over it. This can be achieved by either painting or staining the furniture. Sounds simple, right? Well, that cannot be far from the truth
You don’t need to be a DIY expert to carry out this type of project. All you need is proper guidance and the right methods to get your wood furniture looking new again.
Table of Contents
What causes outdoor wood furniture to weather?
Weathering in wood occurs mainly from the combined action of water and sunlight. Sunlight emits ultraviolet rays that react with substances on wood surfaces causing photochemical oxidation or degradation. When this happens, the tone and color of the wood begin to change until it turns grey. Further damage or degradation will occur if the wood furniture is not maintained. This will eventually cause the wood surface to erode or fade out.
Likewise, excess rainfall causes waterlogging in wood, which leads to swelling and shrinking.
Not only rainfall but also high humidity levels in the air. When there’s high humidity, the amount of vapor in the air increases, some of this water might condense on the wood surface, increasing its moisture content.
An imbalance in moisture content (a situation where there’s more water on the wood surface than inside) can cause stress, which might lead to cupping, warping, and other forms of degradation. The effect of weathering is more pronounced in unprotected wood, leading to a decomposition of the surface and a breakdown in strength.
The physical manifestation of weathering is often a change in color, the appearance of cracks, and the continued erosion of the wood surface (uneven distribution of the wood grains).
A radical color change, specifically a silver-grey color, is usually noticed at the initial stage of weathering. It occurs in both warm and cooler climates and is caused by the washing away of lignin from the surface of the wood by rain or moisture.
Wood weathering can also lead to the growth of fungi such as mold and mildew, which causes discoloration.
Can weathered wood be restored?
Yes, weathered wood can be restored. This can be done by coating the wood surface to mitigate the effects of weathering. Two major types of coating systems are often adopted to protect the wood surface. The first one involves using paint or varnishes to create a film finish or layer on the wood exterior. Before painting wood, a primer needs to be applied first. Painting can be done using a brush or paint roller.
The second system involves staining the wood. Rather than forming a layer or film on the wood exterior, stains penetrate the surface of the wood. You can stain furnishings with a piece of cloth. Priming is not required!
Compared to paints, stains are much easier to maintain. Since they actually”penetrate” into the workpiece, they do not peel or crack even if the wood gets soaked. However, they are mainly used when you wish to restore the natural beauty of the wood furniture as they highlight the wood grains and texture. For a more colorful and customized design, paints are usually preferred.
Whether you choose to paint or stain your furniture, you will decide between using either an opaque coating or a clear one.
Opaque coatings provide the most protection from the elements, so they’re the best as far as minimizing the effects of weathering. On the other hand, transparent coatings provide the most natural appearance.
How do you restore weathered outdoor wood furniture?
Now, it’s time for business. Let’s learn how to restore weathered outdoor wood furniture. Follow the simple steps and choose any one of the methods below:
Preparation
Choose the right weather to work with
If you want to do a good job, then you need to choose the right weather. This is important because the wood furniture needs to dry completely before applying any coating. Even after applying stain, primer, or paint, it will need enough time to dry.
So before you do anything, check your weather forecast, and make sure the weather is clear. If the weather is not clear, then you can postpone the project to a more convenient time when the forecasting indicates there will be no rain.
Clean Up the Furniture
If the weathered furniture has been in storage for a long time, then it’s probably covered with dirt and grime. You can’t do any work on it yet until it’s thoroughly cleaned.
Depending on the amount of dirt, you can use a piece of cloth, stiff bristle brush, cleaning solution, or a combination of these. Here’s how I would do it.
First, I would clean off cobwebs and dust with a rag. For stubborn dirt, I would probably use the stiff brush.
Once I have taken care of the dirt and dust, I will proceed to remove mold stains, watermarks, black spots, and other blemishes. The common way to do this is to clean the wood furniture with bleach and washing liquid.
Mix warm water and washing liquid (mild washing soap). Then add one part bleach to nine parts of the soapy mixture. Then dip a scouring pad into the solution and use it to clean the wooden furniture. You can use a scrubbing brush if you prefer.
Bleach is commonly used to clean teak. You can also use vinegar if you prefer. The steps are basically the same as that of bleach, except that you will be using vinegar instead of bleach.
After cleaning, rinse thoroughly with clean water and allow it to dry.
If there are no black spots or mold stains on the furniture, then you can simply clean with warm water and soap to get rid of the remaining dirt.
Sometimes, simple cleaning, either with soap and water or with bleach or vinegar, will be enough to restore the wood furniture. But if it doesn’t, then you can proceed to the next step.
Sand (& Strip) the Furniture
Once the wood is dry and clean, you sand (and strip) the surface depending on the existing finish on the wood.
If the wood was previously painted, then it makes sense to scrape off or strip the old paint. Besides removing old paint or varnish, stripping also helps to remove any remaining dirt or grime in the wood surface that was not touched by bleach or vinegar.
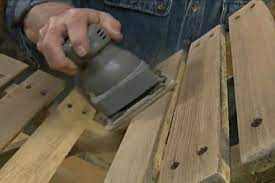
To strip the furniture, you can simply apply a stripping solution to the surface. Allow it to sit for 20 minutes, then scrape off the finish. If you don’t have a stripping solution, then you can use a sander to prepare the surface. I recommend using an orbital sander (125mm).
If you have difficulties stripping the old paint, then you can use a heat gun to loosen it out. Stripping furniture makes it easier to spot cracks and dents.
Note: stripping is usually not required if you’re staining the wood unless the furniture was previously painted.
Next, smoothen out the furniture with a piece of sandpaper. I normally use coarse sandpaper first (80-grit), then finish up with a finer piece (120-grit). Sometimes, I might go further with 240-grit.
Alternatively, you can use a paint eater together with a palm sander to prepare the furniture for painting or staining. This requires less effort and is quicker compared to using a stripper and sanding paper.
Use the paint eater for the first round of sanding (gross sanding), then finish up with the palm sander.
Once you’re done, clean up the sanding dust.
Fill Up Cracks and Dents
Next, inspect the wooden furniture for dents and cracks. If there are any, fill it up with wood filler (otherwise known as “plastic wood”) using a spatula. Once it dries up, sand it down to the same level as the wood surface.
You can apply the filler again if you still spot cracks and sand it down till you get a perfectly smooth surface.
Method 1: Painting
Before painting any piece of furniture, it’s always a good idea to apply primer first. This helps to ensure the paint sits well and also provides additional protection to the wooden piece. I normally recommend an aluminum primer, as it helps to take care of moisture and resin knots.
You can apply the primer using a paintbrush. Make sure you stir well before use. Also, your strokes should follow the same direction as the wood grain. Once you finish, allow the primer to completely dry before painting the furniture. The exact drying time of the primer will depend on the brand and weather conditions.
When the wood is fully dry, you can start painting with your paintbrush. Start with one coat, and allow it to dry completely before you apply more (if necessary). You can rub off the accompanying drips with a piece of fabric or some old cloth.
Method 2: Staining
While painting gives you a more colorful finish, staining highlights the wood grains. So if you wish to obtain a more natural finish, then staining might be a better option.
If you’re using a stain that contains sealing agents, then there’s no need for a separate sealer; otherwise, you would need one. You will also need a stain brush to apply the stain.
Apply the stain after stirring. Make sure the coating is thick but not to the extent it pools. Wait for 15-20 minutes, then wipe off the excess stain with an old cloth (clean cloth).
I recommend using an oil-based stain for outdoor wood furniture as it offers the most protection for the elements. If the furniture is severely faded, then use a stain with pigment instead of a clear stain. Also, you may need to apply two to three coats of stain to get the furniture back in shape.
Allow the stain to dry completely. Water-based stains usually take up to 24 hours to fully dry before you can use the furniture. For an oil-based stain, you may need to wait for 48-72 hours depending on the product, weather condition, and the number of coatings.
Note: Before applying the stain, test it on a small part of the furniture that is not visible. Do this just to be sure of the color.
Optional: Once again, if you are using a stain with chemical sealants, then there’s no need to apply a second sealer. However, if your stain doesn’t contain sealants, then you can apply a separate sealer or finish after the stain dries. You can use either varnish or polyurethane.
How do you fix sun-damaged wood furniture?
Sun-bleached wood furniture can be restored using any one of the methods described above – staining or painting. Depending on the extent of damage, you might need to bleach the wood piece as well.
Start by sanding off the old finish. When done, you may notice that some areas are darker than others. To achieve consistency, you can bleach the part of the furniture that is darker. Peroxide bleach (two-part) usually works fine. Use it with care as it can completely wipe out the natural color of the wood, so only use it on the affected area.
After bleaching the wood, you can apply your chosen stain or dye all over the wood surface so the faded section can look like the rest of the wood. Use a stain with pigment, not a clear stain. You can apply the pigment stain with a brush and remove any excess stain with your rag.
Next, apply a sealer if applicable.
If you still notice some variations in the wood color, then you can apply a second coat of stain or a glaze. However, bear in mind, the finished wood will be darker.
Maintenance tips when handling outdoor wood furniture
You don’t have to wait till your wood furniture takes on a dull and unsightly look before you do something about it. With proper care and maintenance, you can increase their lifespan and preserve their appearance. Here are five maintenance tips I recommend you keep if you want to be a responsible owner.
Use Wood with Care
Not everything should be placed directly on a bare wood surface. For instance, a hot plate of food, a glass of water or juice, a drinking mug, and the likes. These things can cause rings or bring about heat damage over time.
To avoid this, it’s best to cover your wood tables with dressing (tablecloth) or placemats. This provides protection against liquid spills and food. For hot food, you can use a potholder or trivet.
This applies to both outdoor and indoor wood furniture.
Store/Cover Furniture When Not in Use
The best form of protection you can provide for your wood furniture is to minimize their exposure to the elements. This makes perfect sense since weathering is often a product of excess moisture and sunlight.
I would recommend placing in areas with a shade, such as a pergola. This will help protect them from direct sunlight. If you don’t have a shade, consider covering them or bringing them indoors, especially during extended periods when they won’t be in use.
Keep the Furniture Free from Dust
Don’t allow dust to settle on the furniture. Once you notice it, wipe it off. You can make it a chore to clean collected dust on the wood furniture every morning or at least twice a week.
This will help prevent dust buildup, which over time can leave scratches on the wood surface. Always use a soft cotton cloth or diaper for this. You can use lambswool for the hard-to-reach areas.
Clean Wood Regularly
Frequent dusting isn’t usually enough to keep wooden furniture clean. To remove grime and spots, you can clean with a soft cloth soaked in warm soapy water (use a mild dish detergent). For tough stains, use vinegar or baking soda.
Rinse by wiping with another damp cloth, then finally wipe the moisture with a dry cloth.
Conclusion
There you have it – how to restore weathered outdoor wood furniture.
Reviving your wood furniture is a far better deal than purchasing a new set. You will get the furniture to last longer while renewing its appearance. As you can see, there is more than one way to get the job done. Just follow the steps above, and you will be proud of your furniture again.
For severely damaged wood, the methods above might not work. It might be better to replace the furniture or call in a professional wood restorer. We also recommend that you restore items that are still sturdy.