Last updated on June 21st, 2021
Shrinkwrap is a storage option commonly used for outdoor storage or when moving furniture. It usually involves using a shrink wrap roll and a heat source to create a watertight and weatherproof seal. Unlike other storage solutions, you can shrink wrap any item regardless of its size and not worry about tampering. If you’re considering this storage method for the first time, then you might be asking – how to shrink wrap outdoor furniture?
The best way to shrink wrap outdoor furniture for winter is by using industrial shrink wrap and a heat gun. For moving furniture, you will need rolls of moving shrink wrap films. You can either wrap items individually or stack them together as a bundle to save space.
Shrink wrapping is relatively easy but often requires time and caution. But in the end, it is arguably the most effective outdoor storage for your furniture both in winter and during a move. So, it’s definitely worth the extra time and effort.
In this guide, we will show you how to shrink wrap outdoor furniture like a pro.
Table of Contents
Why Shrink wrap outdoor furniture?
The merits of shrink-wrapping your outdoor furniture becomes evident whenever you’re moving or during the winter seasons. You will quickly see the need to protect each piece of furniture from outdoor threats and tampering.
A shrink wrap offers protection from dirt, moisture, UV rays, and other forms of damage associated with the elements. This helps to prevent corrosion and enhance the durability of your furniture.
Shrink wrapping outdoor furniture also seems to be more convenient compared to using a storage facility during winter. The problem with using a storage room is that your garage or basement can quickly get overcrowded, and tarps (for outdoor rugs and carpets) are not 100% waterproof.
On the other hand, with shrink wrap, you can leave your furnishings where they are, whether on the patio, porch, or deck. In other words, there’s no need to overcrowd your garage to pay for any storage facility. Also, shrink wraps are more durable than tarps and offer water-tight protection that keeps the elements out.
How to shrink wrap outdoor furniture
Below is a guide on how to shrink wrap your outdoor furniture. Please make sure you follow each step closely. Shrank wrapping is a heat-intensive procedure, which makes it somewhat dangerous. So if you find the whole thing complicated, then don’t hesitate to hire a professional.
With that in mind, let’s go through the steps.
Prepare Your Workspace
Before you commence, clear out your work area to create enough space for your furniture and to move around. This could be your deck, patio, or anywhere in the yard where you want to keep the furniture. Remove the rugs, flower pots, lawn ornaments, and any other decorative pieces you might have around.
I would recommend up to 15 feet or at least 10 feet of free space. This is important for your safety. Also, choose a non-windy day for the work so you can have complete control over the heat gun. Using the gun on a windy day increases the risk of fire.
However, a heat gun won’t be necessary if your plan is to move the furniture.
Position the Furniture
You can either wrap the furniture individually, or you can stack them together as a bundle. Whichever option you choose is totally fine as long as you’re storing the furniture for winter.
For the individual wrap, make sure each piece of furniture is in its normal upright position.
If you’re stacking the furniture together, then get them in one place to form a cluster. For bundles that consist of chairs and a table, put a blanket or some old towel on the tabletop before placing the chairs. This will keep the chairs and table from rubbing against each other and creating scratches.
The chairs should be set upside down when placed on the table.
If you have only chairs to wrap, then bundle them together by stacking them on each other. You’re free to stack them however you like as long as they take up less space. To save even more storage space, you can place smaller items under the chairs or right on top.
If your chair has an umbrella or canopy, push the pole down to the lowest level. Then hold it down by wrapping some bungee cords around it. This will keep it from opening. If you don’t have any bungee cords, try using rubber bands.
Tie Them Together
Once you have all the items stacked together, the next thing is to tie them up. You can also use zip ties or a few bungee cords for this.
The goal is to secure the stacked furniture in place, so no item slides or falls over while wrapping it or during stormy weather. I recommend trying the armrests and legs and covering all sharp edges (if any) with padding, so they don’t pierce the wrap.
Again, there’s no exact way to tie a stacked bundle of furniture. Anyhow you do it is fine as long as the individual pieces are fastened to each other, and there’s no falling over.
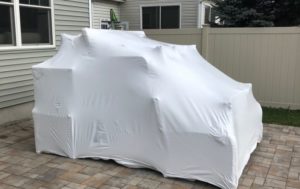
Method 1: Using Industrial Shrink Wrap
Use this method for outdoor storage through winter.
Cover the entire furniture cluster with shrink wrap by spreading it out from the roll. Make sure it doesn’t touch the ground to avoid dirt or debris sticking on the material. Now, after the whole furniture is completely covered, cut off any excess shrink wrap to get the seams lined up.
The next thing is to fuse the seams. For this, you will need a heat gun. After shrinking the wrap, you can tape the fuses to enhance its durability.
Go ahead and add vents to the shrink wrap to maintain proper ventilation inside the wrap. I advise installing at least three vents for a cluster. However, for individual furniture pieces, one vent is usually enough. If there are holes in the course of adding the vents, patch them up.
Note: As earlier indicated, don’t wait till the cold winter months before you add shrink wrap. Besides the risk of the heat gun getting out of control due to the wind, you might also find it difficult to apply the shrink wrap tape. This is because the tape adhesive often loses its malleability due to the cold.
You can get around this by flash heating the wrap (the place where you want to tape) and quickly applying the tape and a little bit of pressure. I must warn you; the process can be tricky.
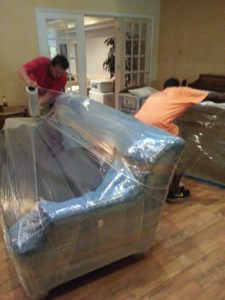
Method 2: Using Moving Shrink Wrap
If you’re not packaging the furniture for winter, then you’re likely preparing it for a move. In this case, you can use shrink wrap without heat.
For this method, you will need a roll of moving shrink wrap (you can get this online or from a store around). This is commonly available in rolls with one or two handles at one end. It’s similar to the plastic used to preserve food items in a fridge, except that it’s much thicker.
You can expect to pay around $25-$50, depending on the length of role you need. Make sure you get what will be enough that will go round the furniture.
Before using the wrap, first, cover the bundle by placing a blanket over it. This will greatly help in preventing scratches and tampering.
Note: You can ignore this if you already placed the blanket as described in step two. Otherwise, you can wrap each piece of furniture individually.
Now, get your moving film, peel off the edge, and stick it on any flat surface at the top or bottom of the furniture. For any move, we usually recommend wrapping each item individually, although this might take more time. You can also wrap multiple items together when needed.
Once you stick one side of the wrap to the surface, grab the roll handle and release the firm as you work it around the furniture. Drape it right, especially at the edge of the furniture.
For rolls without handles, just grab the hollow center with your fingers and walk it around every section of the furniture. You don’t need the legs. Make sure there are no loose films or exposed surfaces (except for the legs) that could create air pockets.
When you’re done, cut off the film using scissors or your hands; then press it down so that it clings to the film underneath.
How do you make homemade shrink wrap?
Shrinkwrap is mainly plastic, so there’s practically no way to make your own version except if you had your own shrink wrap machine. The next thing you could do is use any available sheet made of plastic. A PVC film or some other plastic sheet will do just fine. This could come from a product wrapping or packaging, or you could just buy a roll. The sheet should be a bit larger than the furniture you wish to wrap.
You will need a hairdryer or flame torch (not recommended) for this method. You could also use glue tape, but it will probably not survive the winter cold for too long.
Prepare the furniture you wish to wrap using the method already described above. Then wrap with the plastic sheet until every section is covered. If you’re using a plain sheet rather than a roll, just fold it around the furniture as if you were wrapping a gift.
If there’s any excess seam, just cut it off.
If you’re using a plain plastic sheet, hold the edges together tightly and seal it with the tape. For the roll, seal the film by applying heat to the point where the seam overlaps. The film should be heated evenly through the rest of the wrapping. Uneven heating will result in a disproportionate shrinking of the wrap.
Note: This method requires more time since you will be using a hairdryer instead of a heat gun. Again, make sure you heat evenly. It might take some practice to get this right, but once you do, the wrapped furniture should look similar to a normal shrink wrap.
Like I said earlier, this method is not as effective as using a polyolefin shrink wrap or the other industrial wraps and will likely not hold for too long in inclement weather.
How much does it cost to shrink wrap outdoor furniture?
The cost to shrink wrap outdoor furniture depends on the amount of wrap you’re using. You can expect to spend around $20-$50 depending on the size of the furniture you wish to pack or move. In some cases, the cost may be more if you have more furniture, especially the bigger ones.
In other words, like your furniture size or amount increases, so also will the cost of the shrink wrap. But as you can see, shrink wrapping is generally inexpensive compared to other storage solutions.
What can I use instead of shrink wrap?
Besides shrink wrap, other materials you can use to protect outdoor furniture are bubble wrap and moving blankets. However, while these materials are durable and easily accessible, they do not work for every occasion. Specifically, you can use them during a move but not in winter.
Bubble wraps can be used together with corrugated cardboard sheets to protect wooden furniture. It also works for mirrors and other glass pieces. Moving blankets are thick large fabric commonly used to cover large furniture pieces to protect them from damage.
They are usually padded, which makes them perfect for delicate or fragile items. Blankets made of polyester or polypropylene are usually water-resistant but not completely waterproof. So they can suffice for a move but not for all-winter protection.
If you must use a bubble wrap or moving blanket to protect outdoor furniture during winter, it must be together with a storage facility such as a basement, attic, or garage.
Is shrink wrap waterproof?
Yes, shrink wrap offers 100 percent water protection. This is why it’s one of the most effective outdoor storage options for winter. The material is quite durable and adheres tightly to any surface you use it on. It is also designed to survive boisterous winds and inclement weather.
In fact, after draping with shrink wrap, you can leave your furniture on the patio or deck from winter to spring.
How do you Unshrink shrink wrap?
To unshrink shrink wrap, simply cut the wrapping away. It’s really that simple!
You will need scissors, a trash can, and obviously, your fingers.
- Grab any part of the shrink wrap with your hand. Apply caution, especially if you have a delicate item wrapped inside.
- Using a finger, press the wrap firmly until it breaks, and you can touch the other side of the film.
- Now, start peeling the shrink wrap as you walk around the furniture.
- If you’re not able to break the wrap with the finger, use scissors. First, locate the sharpest edge of the scissors, then use it to poke the wrap. Please be gentle while using the scissors to avoid cutting a part of your furniture.
- Once you get the scissors blade beneath the film, start cutting through the shrink wrap.
- When you’re done, throw the waste into a trash can. Don’t leave it lying around as it can be harmful to pets and children.
This removal technique should be straightforward, but even if you don’t see it that way, it will eventually get easier with time.
Precautions when shrink wrapping outdoor furniture
Shrink Wrapping is a process that often requires heat, so it’s important to take care and caution.
If you are wrapping your furniture for outdoor storage, then you will most likely be using industrial shrink wrap. This usually requires the use of a heat gun to seal the film and seam overlap.
For this purpose, you will need to wear your gloves and keep a fire extinguisher very close. Ideally, the gloves should be heat-resistant, or you might end up burning yourself.
It is worth noting that shrink wrap gets very sticky when heated, regardless of the surface to which it is applied. However, sustaining the heat for a long time can result in a fire.
Windy weather can also cause fire easily as the heat gun will be more difficult to control. This is why you should choose a non-windy day for the job.
In the course of heating, if you detect fire or smoke, stop and examine the wrap carefully to make sure everything is ok. Don’t joke with your safety!
Also, to avoid wasting the shrink wrap, start wrapping from the bottom or top of the furniture and not the middle.
Conclusion
Leaving your outdoor furniture at the mercy of the winter cold can be overwhelmingly disastrous. This applies to all fittings irrespective of their material.
Wood furniture can get water-logged and deteriorate, plastic can stain with mold and mildew, metal can rust, and natural fibers like rattan and bamboo can be demolished. Thus water is not something to take lightly.
With shrink wrap, you can guarantee the safety of your furniture throughout the winter season without spending extra on a storage facility. It is cheap to implement and will extend the useful life of your furniture.
In fact, very few storage options can match the protective strength of shrink wrap.
We hope this guide answered all your questions on how to shrink wrap outdoor furniture. If you have any more questions or suggestions to simplify the process, even more, don’t hesitate to drop your comments.
Till then, happy wrapping!
